The following prerequisites apply to all workstations.
| Req | Description | Resolution |
| 1. | AIMCAD Enterprise Deployment | See https://iwms.uconn.edu/aimcad-configuration-enterprise/ |
| 2. | Static IP address | Submit SR to UITS Networking with users Ethernet MAC Address |
| 3. | Firewall Policy – UConn | Submit SR to UITS Security with users Static IP – All on Port 3306 to Assetworks Database IP 65.211.74.223 |
| 4. | Firewall Policy – AssetWorks | Email Assetworks with users Static IP |
| 5. | Mapped network drive (Note: UNC paths not supported) Q:\UPDC\AIMCAD |
Contact Franchise IT in FOBS if user does not already have access to Q:\UPDC\AIMCAD\ |
| 6. | Administrator access to local PC | Contact Franchise IT in FOBS if user does not already have the needed access |
RealDWG 2010
*Required for users who need to use Export to AiM functionality
| Step | Description |
| 1. | Extract file “02(64)-Real DWG 2010.zip” to local PC |
| 2. | Click on setup.exe to start installation |
| 3. | Accept all defaults |
| 4. | Enter License Key (serial.txt file located in the extracted folder) |
| 5. | Click Install to finish |
DWG Conversion Tool (by Transvoyent)
*Required for users who need to use Export to AiM functionality
| Step | Description |
| 1. | Extract file “03(64)-DWG Converter AutoCAD 2013up.zip” to local PC |
| 2. | Click on DWGConversionToolSetup.msi |
| 3. | Accept all defaults |
| 4. | Click Install to finish |
Setting PATH variables on local PC (to be replaced with PowerShell script)
| Step | Description |
| 1. | System Properties -> Environment Variables |
| 2. | Under System Variables, highlight “Path” variable |
| 3. | Click Edit |
| 4. | Click New (once for each of the following paths) |
| 5. | Type: C:\Program Files\RealDWG 2010 |
| 6. | Type: C:\Program Files\Transvoyant\DWGConversion |
| 7. | Type: Q:\UPDC\AIMCAD\FileUploader9 |
| 8. | Click OK |
Install / Configure ODBC Drivers
Note: Both the 32-bit and 64-bit ODBC drivers must be installed (in order 32, then 64)
| Step | Description |
| 1. | Extract “MySQL_ODBC_Drivers.zip” to local PC |
| 2. | Run “mysql-connector-odbc-5.1.8-winx32.msi” (32-bit) |
| 3. | Open ODBC Data Source Administrator (32-Bit) |
| 4. | Click on System DSN tab->Add->MYSQL ODBC Driver |
| 5. | First, we’ll set up the test database connection |
| 6. | Enter the following details: |
| 7. | Click Test |
| 8. | Upon successful connection, set the Database drop-down to “test” |
| 9. | Click Ok |
| 10. | Now, we’ll configure the production connection. Click on Add->MYSQL ODBC Driver |
| 11. | 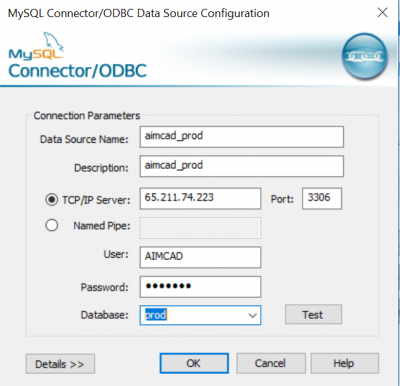 |
| 12. | Click Ok |
| 13. | Click Finish |
| 14. | Run “mysql-connector-odbc-5.1.8-winx64.msi” (64-bit) |
| 15. | Open ODBC Data Source Administrator (64-Bit) |
| 16. | Repeat steps 3-13, ensuring that the Data Source Names set up for 64-bit match those of the 32-bit |
| 17. | If setting up additional environments (e.g. test, stage, etc.), repeat steps 3-9 for both 32-bit and 64-bit connections. |
To configure each user profile on the desktop, proceed to: https://iwms.uconn.edu/aimcad-configuration-user-profile/